Tuesday, August 4, 2015

Antique Plate Collage Wall Art


 Inspiration Photo Series

Ever get inspired by a photo? I always do! I see images of art work, decor, jewelry, recipes, etc. in magazines, Pinterest, and in person. Seeing these creative displays inspires me to push myself to design my own version of it. My goal is never to replicate the inspiration, but to use the ideas or techniques and make it my own.


I began an antique plate collection many years ago as a young teenager when I came upon a few of my grandmother's plates. She was a lover of tradition, elegance and class. She collected serving plates, platters, saucers and simple decorative plates that were displayed modestly in her home.
As a teenager, I had a tastefully decorated bedroom with a few of these plates adorning the walls. No posters of N'Sync or Backstreet Boys hanging from my walls!
After college, I finally got a grown up apartment and wanted to decorate it as such. I had my grandmother's plates tucked away somewhere safe. I came across an inspiration photo of a antique plate collage wall art in a magazine. I instantly knew that this would be the perfect way to display my grandmother's plates. I ripped out the page and went to work! I didn't have enough plates so I began a search to find the perfect additions. I found some lovely plates at Anthropologie and I collected a few more here and there. When I had enough, I began my design.
Can you tell which ones are antique and which ones are new?
I gathered all of the materials including nails, plate hangers of all sizes, a hammer and paper. I used the paper to make a template on the wall to know where the plates would look best. After moving a few plates around, I finished my wall art!
I loved my antique plate collage so much that I redid it in my new home. I tweaked the design a bit after receiving some great additions to my collection. 


Get some inspiration from these Pinterest photos of plate wall art!


Here's another look at my antique plates wall art displayed in my breakfast area of my kitchen.


See something you like? You can make it yourself! Always believe that you can do it. It may take a few tries, but don't give up. You'll figure it out and get better along the way. I'll help you! Just ask me for help and we'll brainstorm ideas together. 

Best of luck with your creative inspiration!

Randee

Sunday, August 2, 2015

August 2015 Jewelry Giveaway

Violets or Blueberry presents my very first giveaway!

Would you like a free piece of handmade jewelry? 

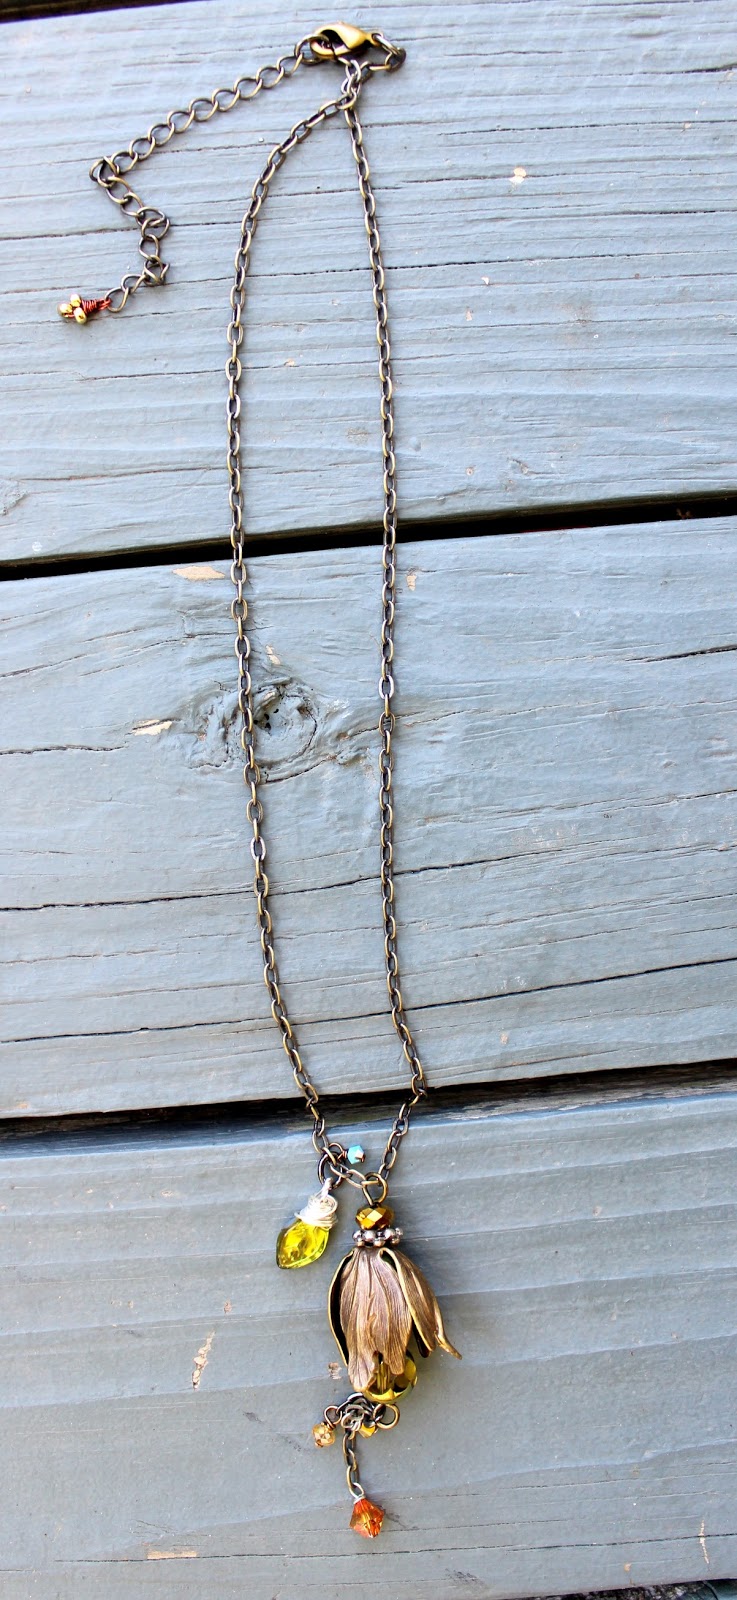
If you answered yes, check out the Flower Necklace below!

Let's start with a little information about the necklace:
My inspiration for making this necklace was the upside down fuchsia flower with its ruffled petals and delicate stamens.
This necklace is adjustable from 16-18" and can be increased in length upon request.
It is made with an antique brass tulip, chain and findings, swarovski crystal beads and a green leaf bead.


The necklace would be a nice addition to a casual shirt or dress or even for a night out. The colors are in neutral shades of brown and gold with a touch of orange, aqua & green. It would look great with neutral tones or even bright colors like aqua and orange! It would be a great gift, too.

Here's how to win this necklace..... 
You must follow my blog (#1) and do 1 of the other options (#s 2-4) below in addition to sending a confirmation email to oftheearthjewelrydesigns@gmail.com letting me know you have entered the giveaway. Once I receive your email, I will confirm that you have entered the giveaway correctly and notify you via email.

1. YOU MUST Follow my blog, www.violetsorblueberry.blogspot.com. You can follow it by subscribing via email. Find the subscribe to email space on the right side under the about me section and enter your email address. This email subscription bar will only be visible in the web version. If using mobile version, click view web version at the bottom of the page. You will receive a confirmation link letting you know you have subscribed (see example image below).
2. Like my Facebook page at www.facebook.com/oftheearthjewelry
3. Follow me on instagram @violetsorblueberry
4. Follow me on Etsy at www.oftheearthjewelry.etsy.com

***If you are already follow my blog, are a Facebook fan, follow me on Instagram, and follow me on Etsy or do not have any of the other social media accounts, you must share a Blog entry and an Etsy item on your Facebook and/or Instagram accounts.

Giveaway entries begin, Sunday, August 2, 2015 and end Sunday, August 23, 2015. The giveaway winner will be announced during the week of August 23rd and will be contacted via email.

Don't forget to send a confirmation email to oftheearthjewelrydesigns@gmail.com. Please include which social media accounts you followed or if you shared a link. 

Thanks so much friends! Please contact me if you have any questions.

Randee

Tuesday, July 28, 2015

Lemon Wreath

Lemon Wreath Tutorial

I finally did it! By it, I mean I finally found time to create the lemon wreath that I've been procrastinating about all summer. It's still summer, right? Good. Then, I'm not too late to have the lemon wreathes hanging on my front door! Time to quit looking at all the plastic lemons hanging around my house. Let's get down to business!


Materials:


5 large artificial lemons
10 small artificial lemons-textured
10 small artificial lemons-smooth 
1 15.5" grapevine wreath
1 stem artificial greenery
4' burlap ribbon

6-8" green floral wire
hot glue
wire cutters
scissors

I purchased most of the materials from Michael's and Amazon. I bought the ribbon on clearance (oh, yeah!) at Michael's along with the greenery and large lemons. The small lemons are from Amazon and the remaining items were materials I already had at home. I provided links to most of the items, but I wasn't able to find the link to the greenery. Sorry!

Directions:

Part 1: Lemons & Greenery

 1. Using the wire cutters, cut the greenery into segments leaving 1-2" of stem. Set aside.


Don't waste that stem! This would be great to spray paint and cover in glitter for Christmas!


2. Get ready for the lemons! Lay the large lemons out to plan their location before the glue. Leave a space wide enough for the bow.


3. Place the hot glue on the entire length of the lemon and stick! Repeat for all 5 large lemons.


4. Grab the greenery! Place hot glue on the entire length of the stem.


5. Angle the stem down and insert into grapevine wreath on the side of the lemon. 


6. Insert greenery on opposite side of the lemon.


 7. Repeat steps 5 & 6 with all lemons.


8. Lay out about half of the small textured lemons in the empty spaces and the others next to the large lemons to see what looks best. Then, glue!


9. Insert the greenery on either side of the small lemons adding more to empty spaces.


10. Repeat step 8 with the small smooth lemons making sure to continue leaving an open space for the bow.


11. Cut the remaining greenery in to small pieces.


12. Insert the remaining greenery throughout the wreath filling in any empty spaces.


Part 2: The Bow

1. Unroll the entire spool of ribbon and cut in half. This roll was 8' so I had 4' of ribbon to use for one bow since I was making two wreaths. If not making two ribbons, cut 4' of ribbon off of your spool.


2. Gather and pinch the ribbon about 1' from the edge. 


 3. Twist the long end of the ribbon to the opposite side. 


4. Flip the long end of the ribbon over to make a small loop. 


5. Gather the ribbon and pinch in the center with the same hand. Can you hold all of this? Yes, you can! Keep going. There's more!


6. The underside of the ribbon will be showing this point. Twist the long end of the ribbon to the top side.


7. With the long end of the ribbon, make a loop slightly bigger than the center loop. Gather and pinch in the middle. 


8. Make a loop on the opposite side. Gather and pinch in the middle. Are your hands cramping yet? Twist the remaining ribbon to the top side.


9. Place the wire through the center loop.


10. Twist the wire tightly to secure the bow. You may need a pair of pliers to get a tight squeeze if you have thick ribbon.


11. Insert the two wire ends of the bow in the empty space on the front of the wreath.


12. Flip the wreath carefully and find the two wire ends. Pull tightly!


13. Twist the wire tightly.


 14. Tuck the wire end into the wreath.


15. Flip the wreath to the front and fluff the bow. Trim the ribbon at an angle. Make your ribbon lengths symmetrical if you'd like....I like asymmetry. 


You're done!


 Make two wreaths if you have double doors like me!


See that dangling little lemon on the top left? I didn't notice it until after I took the pictures. Be sure to glue your lemons better than I did. Hey, I never said I was perfect! 


Saturday, July 25, 2015

Tuna 3 ways

In my house, we love to treat ourselves to a good tuna steak. Well, we like to treat ourselves to a lot of food, especially seafood. As I was walking in the fish section of Costco, I glanced at the selection and was delighted for find a pack of 2 thick ahi tuna steaks up for grabs. So, I grabbed it! It seemed to be a lot of food for two people and one meal, but I decided it would be a be a good multipurpose ingredient to eat for a few meals. Tuna freezes well if you aren't into eating your weight in tuna within a two day span like us!

I went ahead and planned our menu to enjoy our tuna steak three different ways making sure to utilize the ingredients throughout all of the recipes.

1. Asian tuna tartar salsa


2. Asian grilled tuna & pineapple salad with a spicy peanut dressing


3.Tuna, Pineapple & Veggie Spring Rolls with Spicy Peanut Dressing


Marinade

This recipe is for one tuna steak, but you can easily double it for two tuna steaks. Double the marinade recipe if you are making all three tuna recipes with two tuna steaks like I did. This marinade would great with other cuts of meat like shrimp, chicken, beef or pork. If using beef, chicken or pork, marinate for 6-8 hours and if using shrimp, marinate for about 1-2 hours.


Ingredients:
  • 1 1lb ahi tuna steak
  • 1/4 c soy sauce
  • 2 tbsp fish sauce
  • 1/4 c vegetable/canola oil
  • 1 tbsp sesame oil
  • 1 tsp chili oil or 1 tbsp sriracha 
  • 1/2 c packed brown sugar
  • juice of 2 limes
  • 1 tbsp garlic
  • 1 tbsp ginger (optional)
  • Mix the brown sugar & liquids.
  • Squeeze the juice of 1-2 limes (depending on the lime's juiciness).
  • Grate approximately 4 cloves of garlic using a microplane.
  • Grate a thumb size piece of ginger using a microplane.
  • Place the tuna and marinade in a plastic resealable bag.
  • Refrigerate and marinate for 3-6 hours. Going longer than 6 hours will begin to break down the fish.

Asian Tuna Tartar Salsa

Ingredients:
This recipe could easily be divided in half for a couple of people, but use the whole tuna steak if you have several people or want leftovers! This recipe uses RAW tuna...hence the term "tartar." This dish is reserved only for our slightly adventurous eaters.
  • 1 1 lb marinated tuna steak diced
  • 1 medium tomato diced
  • 1 ripe avocado diced
  • 1 jalapeno with seeds & membranes removed diced finely
  • 1/4 cup green or red onion diced finely
  • 2 tbsp cilantro chopped
  • 1 tbsp sesame seeds
  • 1 small cucumber diced (optional) 
  • 1/4 c leftover marinade
  • 1 tsp honey (optional)
  • 1 tsp sriracha (optional)
  • Dice all ingredients into equal sizes making sure to chop the jalapeno and onions smaller so they can mix throughout better. I actually preferred the recipe without the cucumber, but you can add it for a little extra crunch and to stretch the recipe if guests are coming.
  • Place all ingredients into a bowl.
  • Mix 1/4 cup marinade with 1 tsp honey if you'd like the marinade a little sweeter. Taste as you go! You can also add any other flavors that  you'd like more of at this point like sriracha for some added heat.
  • Line a small container like a small loaf pan or ramekin with plastic wrap.
  • Fill the container with the tuna salsa mixture and press it firmly with the back of a spoon until tightly packed and smooth.
  • You may have some of the tuna mixture leftover (like me) depending on the size of the container and the amount of tuna used.
  • Now we need to invert the tuna salsa onto a plate! Place a plate on top of the filled container and....
  • flip! Remove the container from the tuna salsa. If the tuna salsa doesn't stay together, then put it back in the container, press firmly, and try again!
  • Remove the plastic.

  • Enjoy the tuna salsa with your favorite tortilla chips! We prefer the thin and crispy restaurant style with this recipe. Great appetizer to bring to a party or enjoy with friends and family at home!
Spicy Peanut Dressing

Ingredients:
  • 2 tbsp creamy peanut butter
  • 2 tbsp pepper jelly (1 tbsp honey and 1 tbsp sriracha could be used in place of the pepper jelly).
  • 2 tbsp rice wine vinegar
  • 2 tsp sesame oil
  •  1/4 c olive oil/veg/canola oil
  •  juice of 1 lime
  • 1 tbsp soy (not pictured)
  • You could make this dressing in a mason jar and shake, shake, shake, but due to the peanut butter, it's easier just to use a blender or mixer. 
    • Put all ingredients into the blender and press the dressing button or pulse until thoroughly mixed.

The peanut butter makes it the perfect consistency! Place in a jar and set aside. Refrigerate after making.

 Asian Grilled Tuna & Pineapple Salad with Spicy Peanut Dressing


Ingredients:
  • 1 1lb tuna steak that has been marinated
  • 4 pineapple rings sliced 1/2 inch thick (use fresh pineapple as it will hold up better on the grill and taste better too!)
  • 1 head of lettuce chopped
  • 1 tomato diced
  • 1 medium cucumber diced
  • 2-3 green onions chopped or 1 small red onion or shallot
  • 1/4 c roughly chopped cilantro
  • 1/3 c crunchy asian chow mein noodles
  • spicy peanut dressing (see recipe above)
  • avocado (optional)
    Ingredients:
    • 1 1lb tuna steak that has been marinated
    • 4 pineapple rings sliced 1/2 inch thick (use fresh pineapple as it will hold up better on the grill and taste better too!)
    • 1 head of lettuce chopped
    • 1 tomato diced
    • 1 medium cucumber diced
    • 2-3 green onions chopped or 1 small red onion or shallot
    • 1/4 c roughly chopped cilantro
    • 1/3 c crunchy asian chow mein noodles
    • spicy peanut dressing (see recipe above)
    • avocado (optional) 


      • Heat grill to medium high heat and place tuna and pineapple rings onto grill.
      • Grill for approximately 2-3 minutes per side until you get nice grill marks.
        • The tuna will be medium rare. If you prefer a medium tuna steak, add 1-2 minutes more per side. And if you prefer a well done tuna steak, buy it from a can! I kid, I kid....cooking tuna well done is not my preferred method of cooking this delicious meat, but do what you like. Grill the tuna until fully cooked.
      • Chop all salad ingredients.
      • Cut the tuna into thin slices. 
      • Add the spicy peanut dressing to your salad. You can prepare each salad individually or make a whole bowl. This recipe will serve 4-5 people.

      Tuna, Pineapple & Veggie Spring Rolls
      • This is a great snack or appetizer to use your leftover tuna steak and veggies. You can also make it with pork, shrimp, chicken, beef and even veggie. 

       Ingredients:

      **The amount of ingredients used depends on how many rolls you are making. This will make 4-5 rolls.
      • 4 rice paper sheets (these are available for purchase at any asian market, online and maybe even at your local grocery store) 
      • 1/2 c vermicelli noodles (rice or bean thread) cooked according to package instructions
      • 1/2 c grilled tuna steak (use the left overs from the previous recipe or grill a tuna steak for this dish) thinly sliced
      • 1-2 grilled pineapple rings
      • 1/2 medium cucumber
      • 1 green onion
      • 1 bell pepper
      • 1 avocado
      • 1/4 c cilantro 
      • 1 c lettuce 
      • Spicy Peanut Dressing (see previous recipe)
      • Peanuts (to garnish)
      Directions:
      • Slice all veggies and fruits into thin 3 inch sticks, chop cilantro & lettuce, slice the tuna steak.
      •  Gather your tools: a shallow dish filled with water and a dry plate.
      • Here comes the tricky part!
      • Quickly submerge your rice paper sheet into the water until it's fully covered with water on all over.
      • Move fast! Place the wet rice paper sheet on the plate. It will get very sticky and difficult to manage if it is too wet or rolled fast enough.
      • Place your tuna on the rice paper first. The rice paper will act as a little window into the spring roll. Put the main ingredient first so you can see what's inside.
      • Start stacking your ingredients! Avocado, cucumber, pineapple.....
      • lettuce, peppers, onions, cilantro.......don't put too much or it will be difficult to wrap.
      ]
      • Pull one side of the sticky rice paper roll over the filling.
      • Bring each side over to the center. Keep moving fast!
      • Tuck the filling in tightly and begin rolling the filling to meet the other side of the rice paper sheet.
      • If your rice paper is sticking to the plate, you may want to lightly spray the plate with veggie oil spray before starting the next roll.
      • If your rice paper tears, no worries. Try again! 
      • It may take a few tries before you get it. Don't give up!


      • Use the leftover spicy peanut dressing with a few chops peanuts as a delicious dipping sauce for your tuna, pineapple and veggie spring rolls. Enjoy!
      **********************************************************************************
      Asian Tuna Marinade


      Ingredients:
      • 1 1lb ahi tuna steak
      • 1/4 c soy sauce
      • 2 tbsp fish sauce
      • 1/4 c vegetable/canola oil
      • 1 tbsp sesame oil
      • 1 tsp chili oil or 1 tbsp sriracha 
      • 1/2 c packed brown sugar
      • juice of 2 limes
      • 1 tbsp garlic
      • 1 tbsp ginger (optional)
      Directions:
      1. Mix the brown sugar & liquids.
      2. Squeeze the juice of 1-2 limes (depending on the lime's juiciness). 
      3. Grate approximately 4 cloves of garlic using a microplane.
      4. Grate a thumb size piece of ginger using a microplane. 
      5. Place the tuna and marinade in a plastic resealable bag.
      6. Refrigerate and marinate for 3-6 hours. Going longer than 6 hours will begin to break down the fish. 
      (Meat Marinade Time: Tuna, Pork, Chicken- 3-6 hours, Beef- 6-8 hours, Shrimp- 1-2 hours)

      **********************************************************************************
      Asian Tuna Tartar Salsa 


      Ingredients:
      • 1 1 lb marinated tuna steak diced
      • 1 medium tomato diced
      • 1 ripe avocado diced
      • 1 jalapeno with seeds & membranes removed diced finely
      • 1/4 cup green or red onion diced finely
      • 2 tbsp cilantro chopped
      • 1 tbsp sesame seeds
      • 1 small cucumber diced (optional) 
      • 1/4 c leftover marinade
      Directions:
      1. Dice all ingredients into equal sizes making sure to chop the jalapeno and onions smaller so they can mix throughout better. I actually preferred the recipe without the cucumber, but you can add it for a little extra crunch and to stretch the recipe if guests are coming. 
      2. Place all ingredients into a bowl.
      3. Mix 1/4 cup marinade with 1 tsp honey if you'd like the marinade a little sweeter. Taste as you go! You can also add any other flavors that you'd like more of at this point like sriracha for some added heat or soy for added salt.
      4. Line a small container like a small loaf pan or ramekin with plastic wrap.
      5. Fill the container with the tuna salsa mixture and press it firmly with the back of a spoon until tightly packed and smooth.
        You may have some of the tuna mixture leftover (like me) depending on the size of the container and the amount of tuna used.
      6. Now we need to invert the tuna salsa onto a plate! Place a plate on top of the filled container and flip. Remove the plastic wrap.
        If the tuna salsa doesn't stay together, then put it back in the container, press firmly, and try again!
      7. Enjoy the tuna salsa with your favorite tortilla chips! We prefer the thin and crispy restaurant style with this recipe. 
      Great appetizer to bring to a party or enjoy with friends and family at home!

      **********************************************************************************
       Spicy Peanut Dressing


      Ingredients:
      • 2 tbsp creamy peanut butter
      • 2 tbsp pepper jelly (1 tbsp honey and 1 tbsp sriracha could be used in place of the pepper jelly).
      • 2 tbsp rice wine vinegar
      • 2 tsp sesame oil
      •  1/4 c olive oil/veg/canola oil
      •  juice of 1 lime
      • 1 tbsp soy (not pictured)
       Directions:
      1. Put all ingredients into the blender and press the dressing button or pulse until thoroughly mixed.
      2.  Place in a jar and set aside. Refrigerate after making.

      **********************************************************************************
      Asian Grilled Tuna & Pineapple Salad


      Ingredients:
      • 1 1lb tuna steak that has been marinated
      • 4 pineapple rings sliced 1/2 inch thick (use fresh pineapple as it will hold up better on the grill and taste better too!)
      • 1 head of lettuce chopped
      • 1 tomato diced
      • 1 medium cucumber diced
      • 2-3 green onions chopped or 1 small red onion or shallot
      • 1/4 c roughly chopped cilantro
      • 1/3 c crunchy asian chow mein noodles
      • spicy peanut dressing (see recipe above)
      • avocado (optional)
       Directions:
      1. Heat grill to medium high heat and place tuna and pineapple rings onto grill.
      2. Grill for approximately 2-3 minutes per side until you get nice grill marks.
        •  The tuna will be medium rare. If you prefer a medium tuna steak, add 1-2 minutes more per side. And if you prefer a well done tuna steak, buy it from a can! I kid, I kid....cooking tuna well done is not my preferred method of cooking this delicious meat, but do what you like. Grill the tuna until fully cooked.
      3. Chop all salad ingredients.
      4. Cut the tuna into thin slices.
      5. Add the spicy peanut dressing to your salad. You can prepare each salad individually or make a whole bowl.
      **********************************************************************************
      Grilled Tuna, Pineapple and Veggie Spring Rolls with Spicy Peanut Dressing
       
      Ingredients:

      **The amount of ingredients used depends on how many rolls you are making. This will make 4-5 rolls.
      • 4 rice paper sheets (these are available for purchase at any asian market, online and maybe even at your local grocery store) 
      • 1/2 c vermicelli noodles (rice or bean thread) cooked according to package instructions
      • 1/2 c grilled tuna steak (use the left overs from the previous recipe or grill a tuna steak for this dish) thinly sliced
      • 1-2 grilled pineapple rings
      • 1/2 medium cucumber
      • 1 green onion
      • 1 bell pepper
      • 1 avocado
      • 1/4 c cilantro 
      • 1 c lettuce 
      • Spicy Peanut Dressing (see previous recipe)
      • Peanuts (to garnish)
      Directions:
      1. Slice all veggies and fruits into thin 3 inch sticks, chop cilantro & lettuce, slice the tuna steak. Set aside.
      2. Gather your tools: a shallow dish filled with water and a dry plate.
      3. Here comes the tricky part! Quickly submerge your rice paper sheet into the water until it's fully covered with water all over.
      4. Move fast! Place the wet rice paper roll on the plate. It will get very sticky and difficult to manage if it is too wet or rolled fast enough.
      5.  Place your tuna on the rice paper first. The rice paper will act as a little window into the spring roll. Put the main ingredient first so you can see what's inside.
      6.  Start stacking your ingredients! Avocado, cucumber, pineapple,
        lettuce, peppers, onions, cilantro making sure not to put too much or it will be difficult to wrap.
      7.  Pull one side of the sticky rice paper roll over the filling.
      8.  Bring each side over to the center. Keep moving fast! 
      9.  Tuck the filling in tightly and begin rolling the filling to meet the other side of the rice paper sheet.
        •  It may take a few tries before you get it. Don't give up! 
        • If your rice paper is sticking to the plate, you may want to lightly spray the plate with veggie oil spray before starting the next roll.
        • If your rice paper tears, no worries. Try again!
      10. Use the leftover spicy peanut dressing with a few chops peanuts as a delicious dipping sauce for your tuna, pineapple and veggie spring rolls. Enjoy!